Integrate an HTTP API
Squid offers the capability to integrate an API with your project, allowing you to harness the power of Squid with multiple data sources without worrying about a complex migration.
TL;DR
In this tutorial you will learn how to connect an external HTTP API to your Squid project. This includes:
- Adding the integration in the console
- Creating security rules for an API integration
- Using the integration in a client project
This tutorial uses React and Squid to connect to a sample Cat Facts API and display a random fact about cats. A basic understanding of React and the Squid platform is beneficial, but there are no prerequisites for this guide.
To view a completed version of the app, check out the Squid Cloud HTTP API sample on GitHub.
Create a new React project
First, create a new directory that will contain all the files for this project.
mkdir api
Next, cd into the root directory and create a new React typescript application using Vite. This creates the frontend of the project.
npm create vite@latest api-frontend -- --template react-ts
Next, change to the newly created directory and install all dependencies:
cd api-frontend
npm install
Create a new app in the console
- Navigate to the Squid Console and create a new application named
api.
Squid provides two different target environments for development and production. Use
the dev environment for this tutorial, but note that prod is an option as well.
For the application to work, ensure that you are using the same
target environment throughout the project. To learn more, read about Squid's environments.
- Follow the steps in the console to generate a backend template project. To view these steps, click the
Initialize backendandCreate .env fileon the overview page. Make sure tocdback into the root project directory before initializing the backend so that the frontend and backend directories are siblings.
Create an API integration
- In the console, navigate to the application's Integrations page and add a new
API integration. Note that integrations are not shared across environments, so make sure you are using the correct environment (likelydevfor development purposes).

- Enter values in the two input fields,
Integration IDandOpenAPI specification URL:
- For the ID, choose something meaningful which represents what this integration represents, such as
catFacts - The OpenAPI specification provides a standardized way to document APIs. The URL is provided by the API and can be found on the API's home page: https://catfact.ninja/docs/api-docs.json
Providing this URL establishes Squid's connection to the API. Click the Next button to see Squid automatically discover the API Schema. Whenever a change is made to the API, you can manually Rediscover schema as well (though this will not be needed in this tutorial).
To finalize the connection to the Cat Facts API, edit the Base URL in the top left of the integration screen. The base URL provides the initial path for all available endpoints in this API. The URL can be found in the API's home page by executing a sample query. For the Cat Facts API, the URL is https://catfact.ninja.
Click Add integration to add the API to your project!
Understanding the integration
Now that we have added the API integration, we can begin to understand more about how to use the integration. The integration's Schema page lists all the endpoints Squid automatically discovered.
As an example, click on the getRandomFact endpoint.
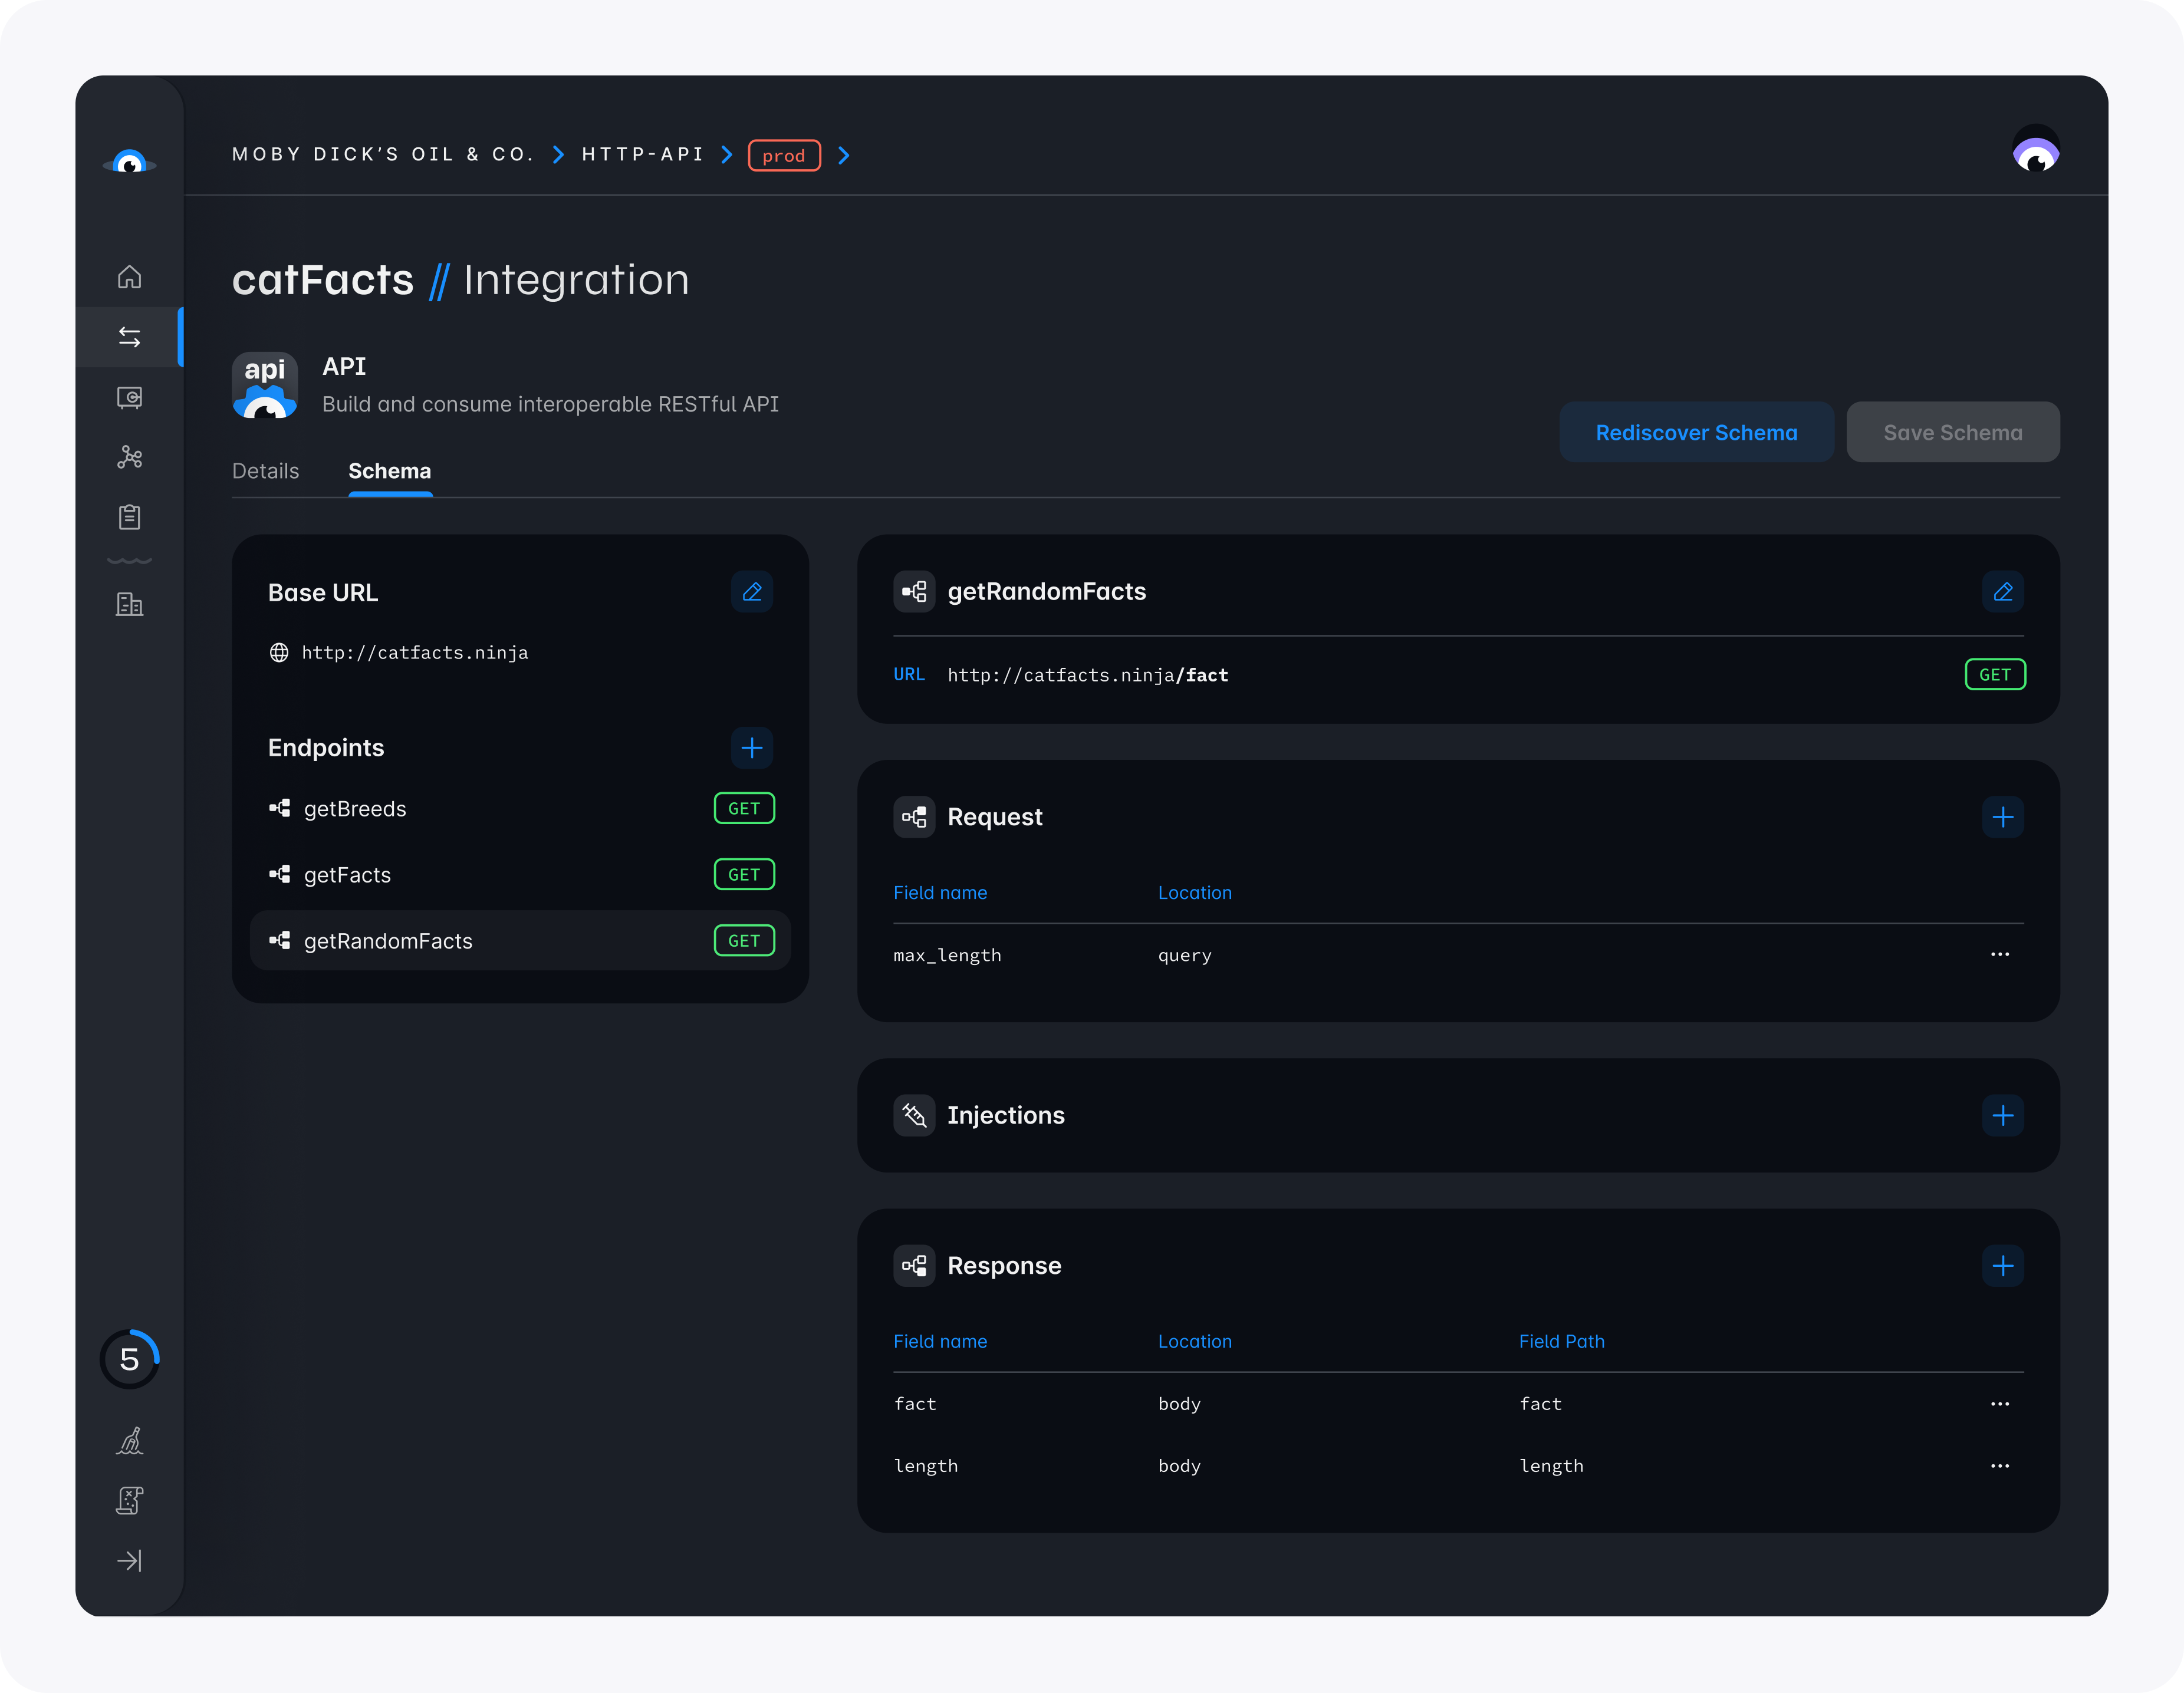
This view provides all the information you need to utilize each endpoint:
- URL: describes the path for using this endpoint.
- Request: provides a list of options that are required for this endpoint. For
getRandomFact, you must specify themax_lengthof the fact. - Injections: inject additional fields to all requests for that endpoint, either in the header or body. This can be used to store secret values, such as an API Key. Because the Cat Facts API does not require an API Key, we do not need to add an injection.
- Response: describes what a response looks like after consuming this endpoint. For
getRandomFact, the response contains two fields – the catfact, and thelengthof the fact.
With this information we are now ready to use the integration in our project.
Security rules
Security rules are required for all external API integrations. This allows you to create custom logic for authorizing access to
integrations and specific endpoints. Since authentication and authorization are outside the scope of this tutorial, we
create a security rule which allows for all access to the catFacts integration.
To learn more about securing your data, read about Squid's backend security rules.
Security rules are located in the file api-backend/src/service/example-service.ts. The security rules can be expanded
by adding a decorator to the SquidService class. To create a security rule for an API integration, use the @secureApi
decorator, which takes the integration_id as a parameter. Create a new security rule in the ExampleService class:
import { secureApi, secureDatabase, SquidService } from '@squidcloud/backend';
import { ApiCallContext } from "@squidcloud/client";

...

export class ExampleService extends SquidService {

  ...

  @secureApi('catFacts')
  secureCatFacts(context: ApiCallContext): boolean {
    return true; // Allows all access to the catFacts integration
  }
}
Use the API on the client
The last step is to use the integration in the React project using the Squid React SDK.
Setup
- Install the Squid React SDK in the
api-frontenddirectory:
npm install @squidcloud/react
- In
src/main.tsx, wrap theAppcomponent in theSquidContextProviderwith the configuration options located in your.envfile. The.envfile was automatically generated while creating the app in the console.
import { SquidContextProvider } from '@squidcloud/react';


...

ReactDOM.createRoot(document.getElementById('root')!).render(
    <SquidContextProvider
      options={{
        appId: 'YOUR_APP_ID',
        region: 'YOUR_REGION', // example: 'us-east-1.aws'
        environmentId: 'dev | prod', // choose one of 'dev' or 'prod'
        squidDeveloperId: 'YOUR_SQUID_DEVELOPER_ID',
      }}
    >
      <App />
    </SquidContextProvider>
);
App.tsx
- Edit
src/App.tsxto utilize the new integration.
We can use the squid.api().request() method in the Squid React SDK to use an endpoint in the API integration. The request() method takes three parameters:
integrationId: we named this integrationcatFactsendpointId: we usegetRandomFactafter discovering the API's schema in the consolebodyobject: which we know from earlier that the request must contain amax_length
The request() method returns a promise:
squid.api().request('catFacts', 'getRandomFact', { max_length: 70 });
- We can now invoke this method in our
Appcomponent. First, create a React state to track the fact that the integration returns. Once we invoke therequestfunction, we can update the state with the new fact data. Becauserequestreturns a promise, we must use the.thenmethod to access the data once the promise is resolved. As a React trick, we will wrap the call in auseEffecthook so that it only executes once.
function App() {
  const squid = useSquid();

  /* The endpoint's response object has a fact and its length. This can be
   * verified in the console */
  const [randomFact, setFact] = useState({ fact: '', length: 0 });

  useEffect(() => {
    squid
      .api()
      .request('catFacts', 'getRandomFact', { max_length: 70 })
      .then((data) => {
        setFact(data.body as RandomFact);
      });
  }, []);
}
- Render the fact on the page by accessing the
factfield of thecatFactstate. The fullApp.tsxis as follows:
import { useEffect, useState } from 'react';
import { useSquid } from '@squidcloud/react';
import './App.css';

interface RandomFact {
  fact: string;
  length: number;
}

function App() {
  const squid = useSquid();
  const [randomFact, setFact] = useState({ fact: '', length: 0 });

  useEffect(() => {
    squid
      .api()
      .request('catFacts', 'getRandomFact', { max_length: 70 })
      .then((data) => {
        setFact(data.body as RandomFact);
      });
  }, []);

  return (
    <>
      <div>
        Fact: {randomFact?.fact} <br />
        Length: {randomFact?.length}
      </div>
    </>
  );
}

export default App;
Run the project
To run the project, you must start both the client React project and the backend Squid project.
- To run the backend, run the following from the
api-backendfolder:
squid start
- To run the client, open a second terminal window and run the following from the root folder:
npm run dev
You can now see the client project running at http://localhost:PORT, where the port is logged in the terminal. The page displays the fact and its length in characters. To view a new random cat fact, refresh the page.
Congratulations! You have officially setup your first API integration with Squid in just a matter of minutes!
Next steps
To learn more about the capabilities of Squid API integrations, view the Client SDK documentation on calling an API. To find out how to customize security for your HTTP API endpoint, view the Backend SDK documentation.
Bonus: Incoroporate HTTP headers
Often times, your API integrations will require specialized headers, including secrets. With Squid, you can quickly configure these value in the console and securely access them to make requets to secured endpoints.
To demonstrate this, we have a different cat facts API that requires an API key with requests. This API doesn't have an available OpenAPI spec, so we can also use this as an opportunity to walk through adding the schema manually.
Subscribe to the Random Cat Fact API. There is a $0 subscription available for this API. If you don't have a RapidAPI account, you will need to make one. Subscribing enables you to connect to the endpoint with your RapidAPI key.
In the Squid Cloud Console, add a new HTTP API integration. Give the integration an ID of
catFacts2.Click Add integration. This API doesn't have an OpenAPI spec, so the URL for the Open API spec should be left blank.
Provide the base URL of the endpoint: https://random-cat-fact.p.rapidapi.com.
Click Add endpoint. name the endpoint catFact with a relative path of /. The HTTP method is GET.
Click Add endpoint to save the endpoint.
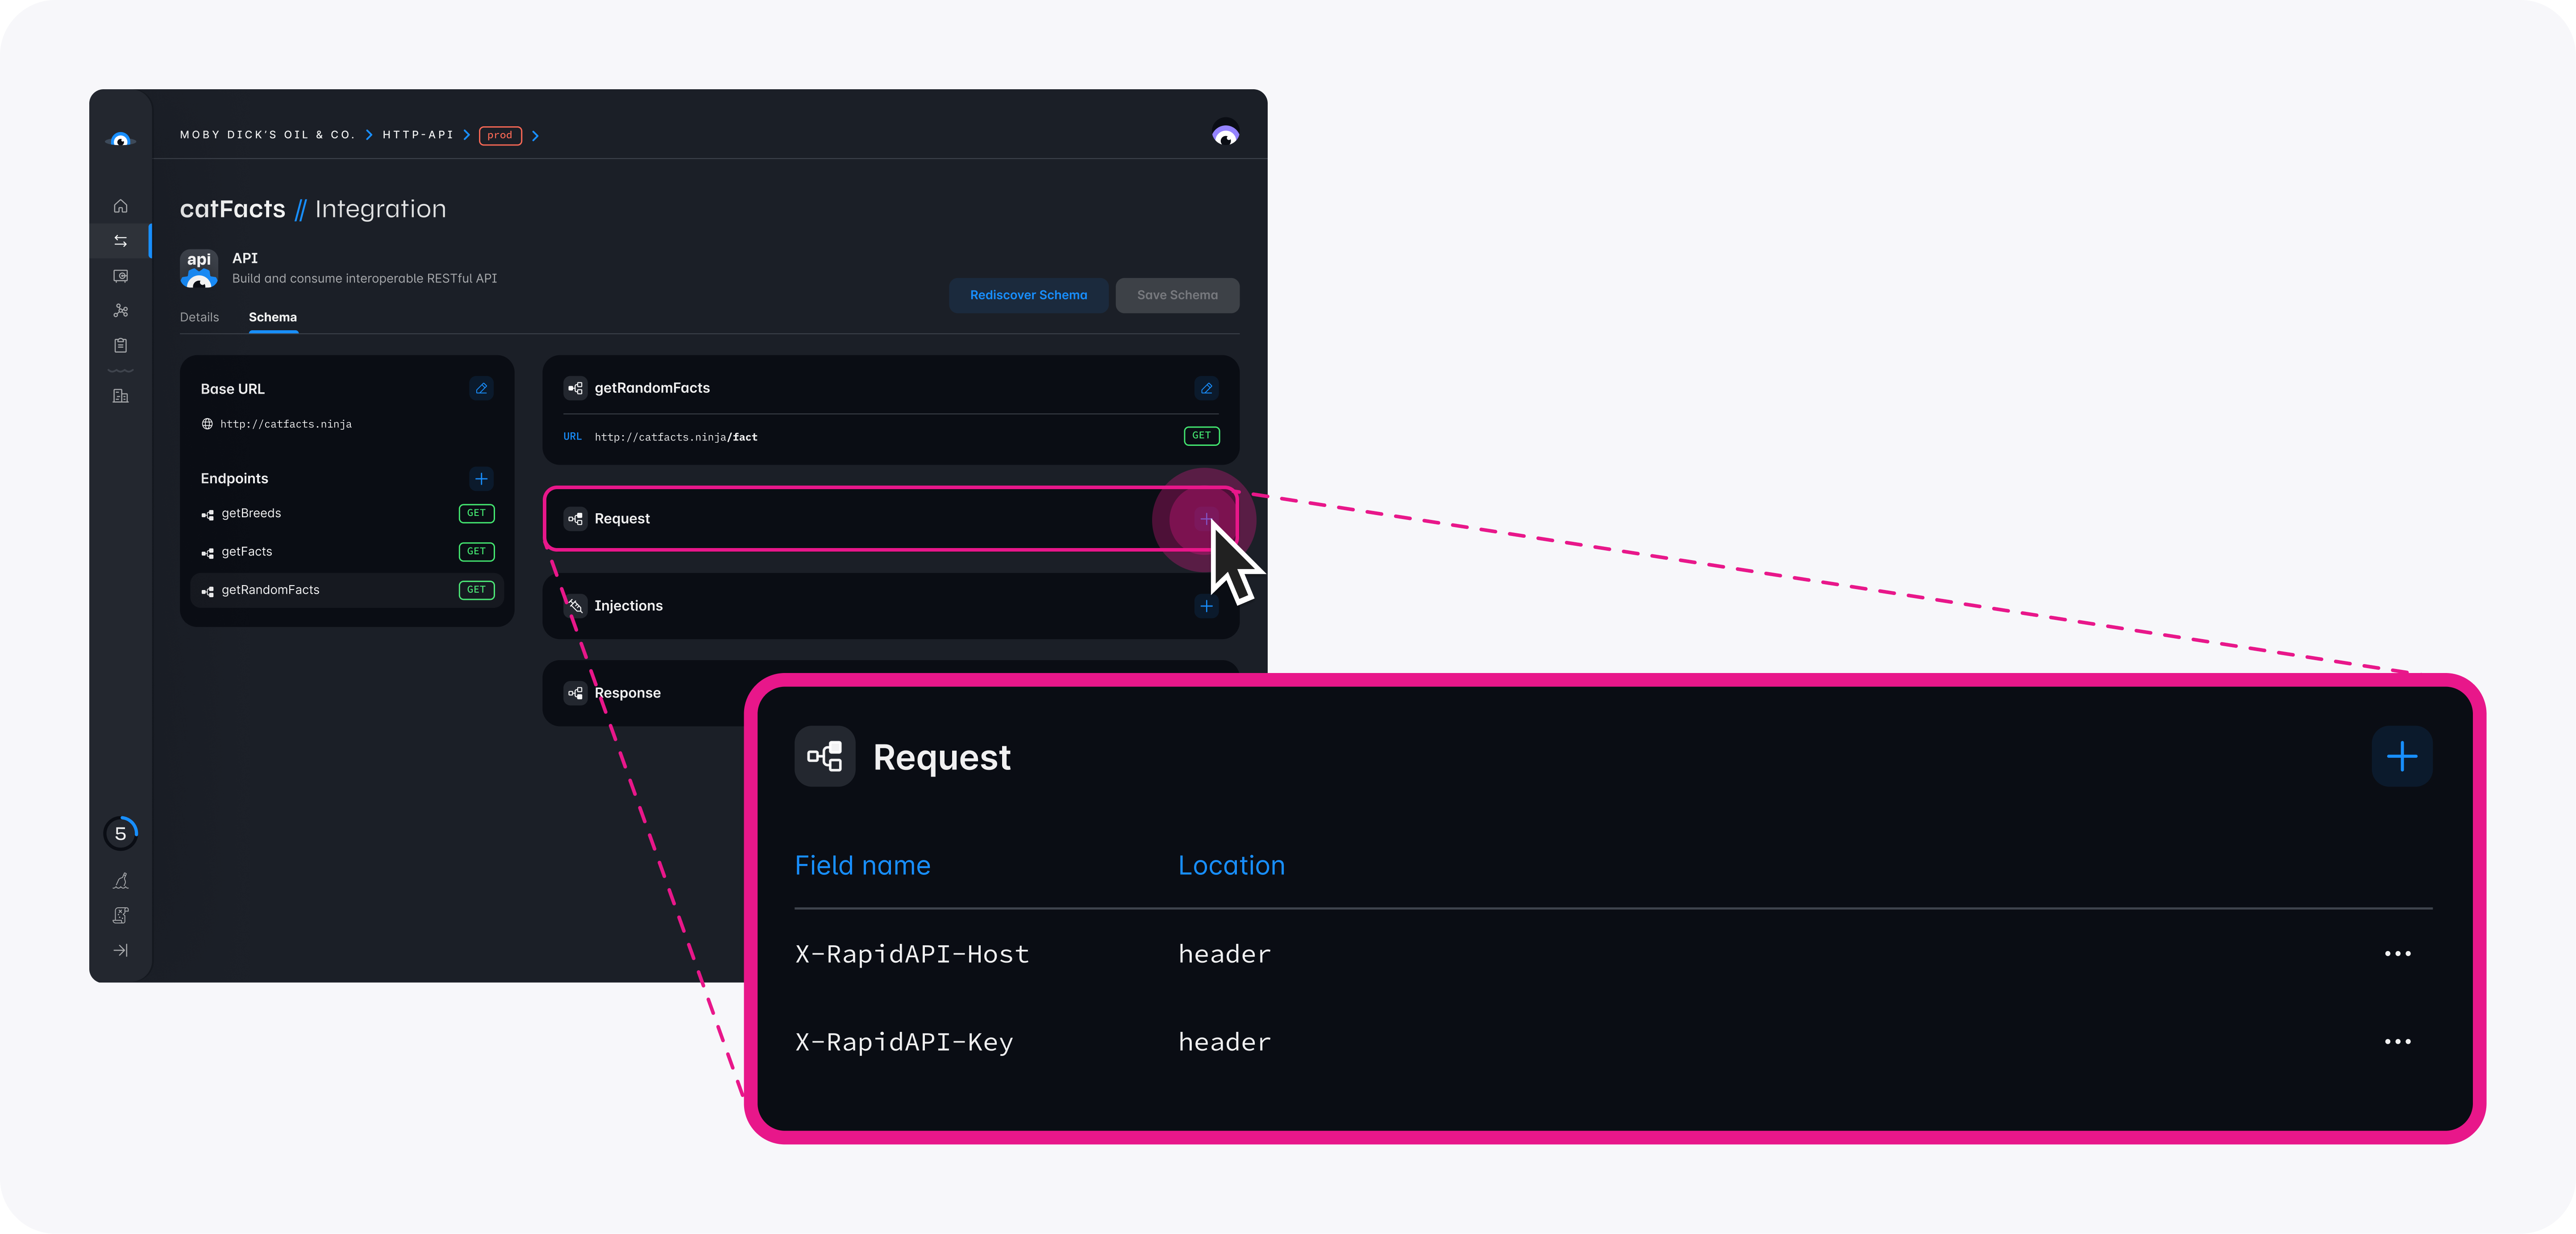
There are two headers required by the API: X-RapidAPI-Key and X-RapidAPI-Host. Let's add these to the API schema in the Squid Cloud Console.
- Click the + within Request and add a field named X-RapidAPI-Key. The location of the field is HEADER.
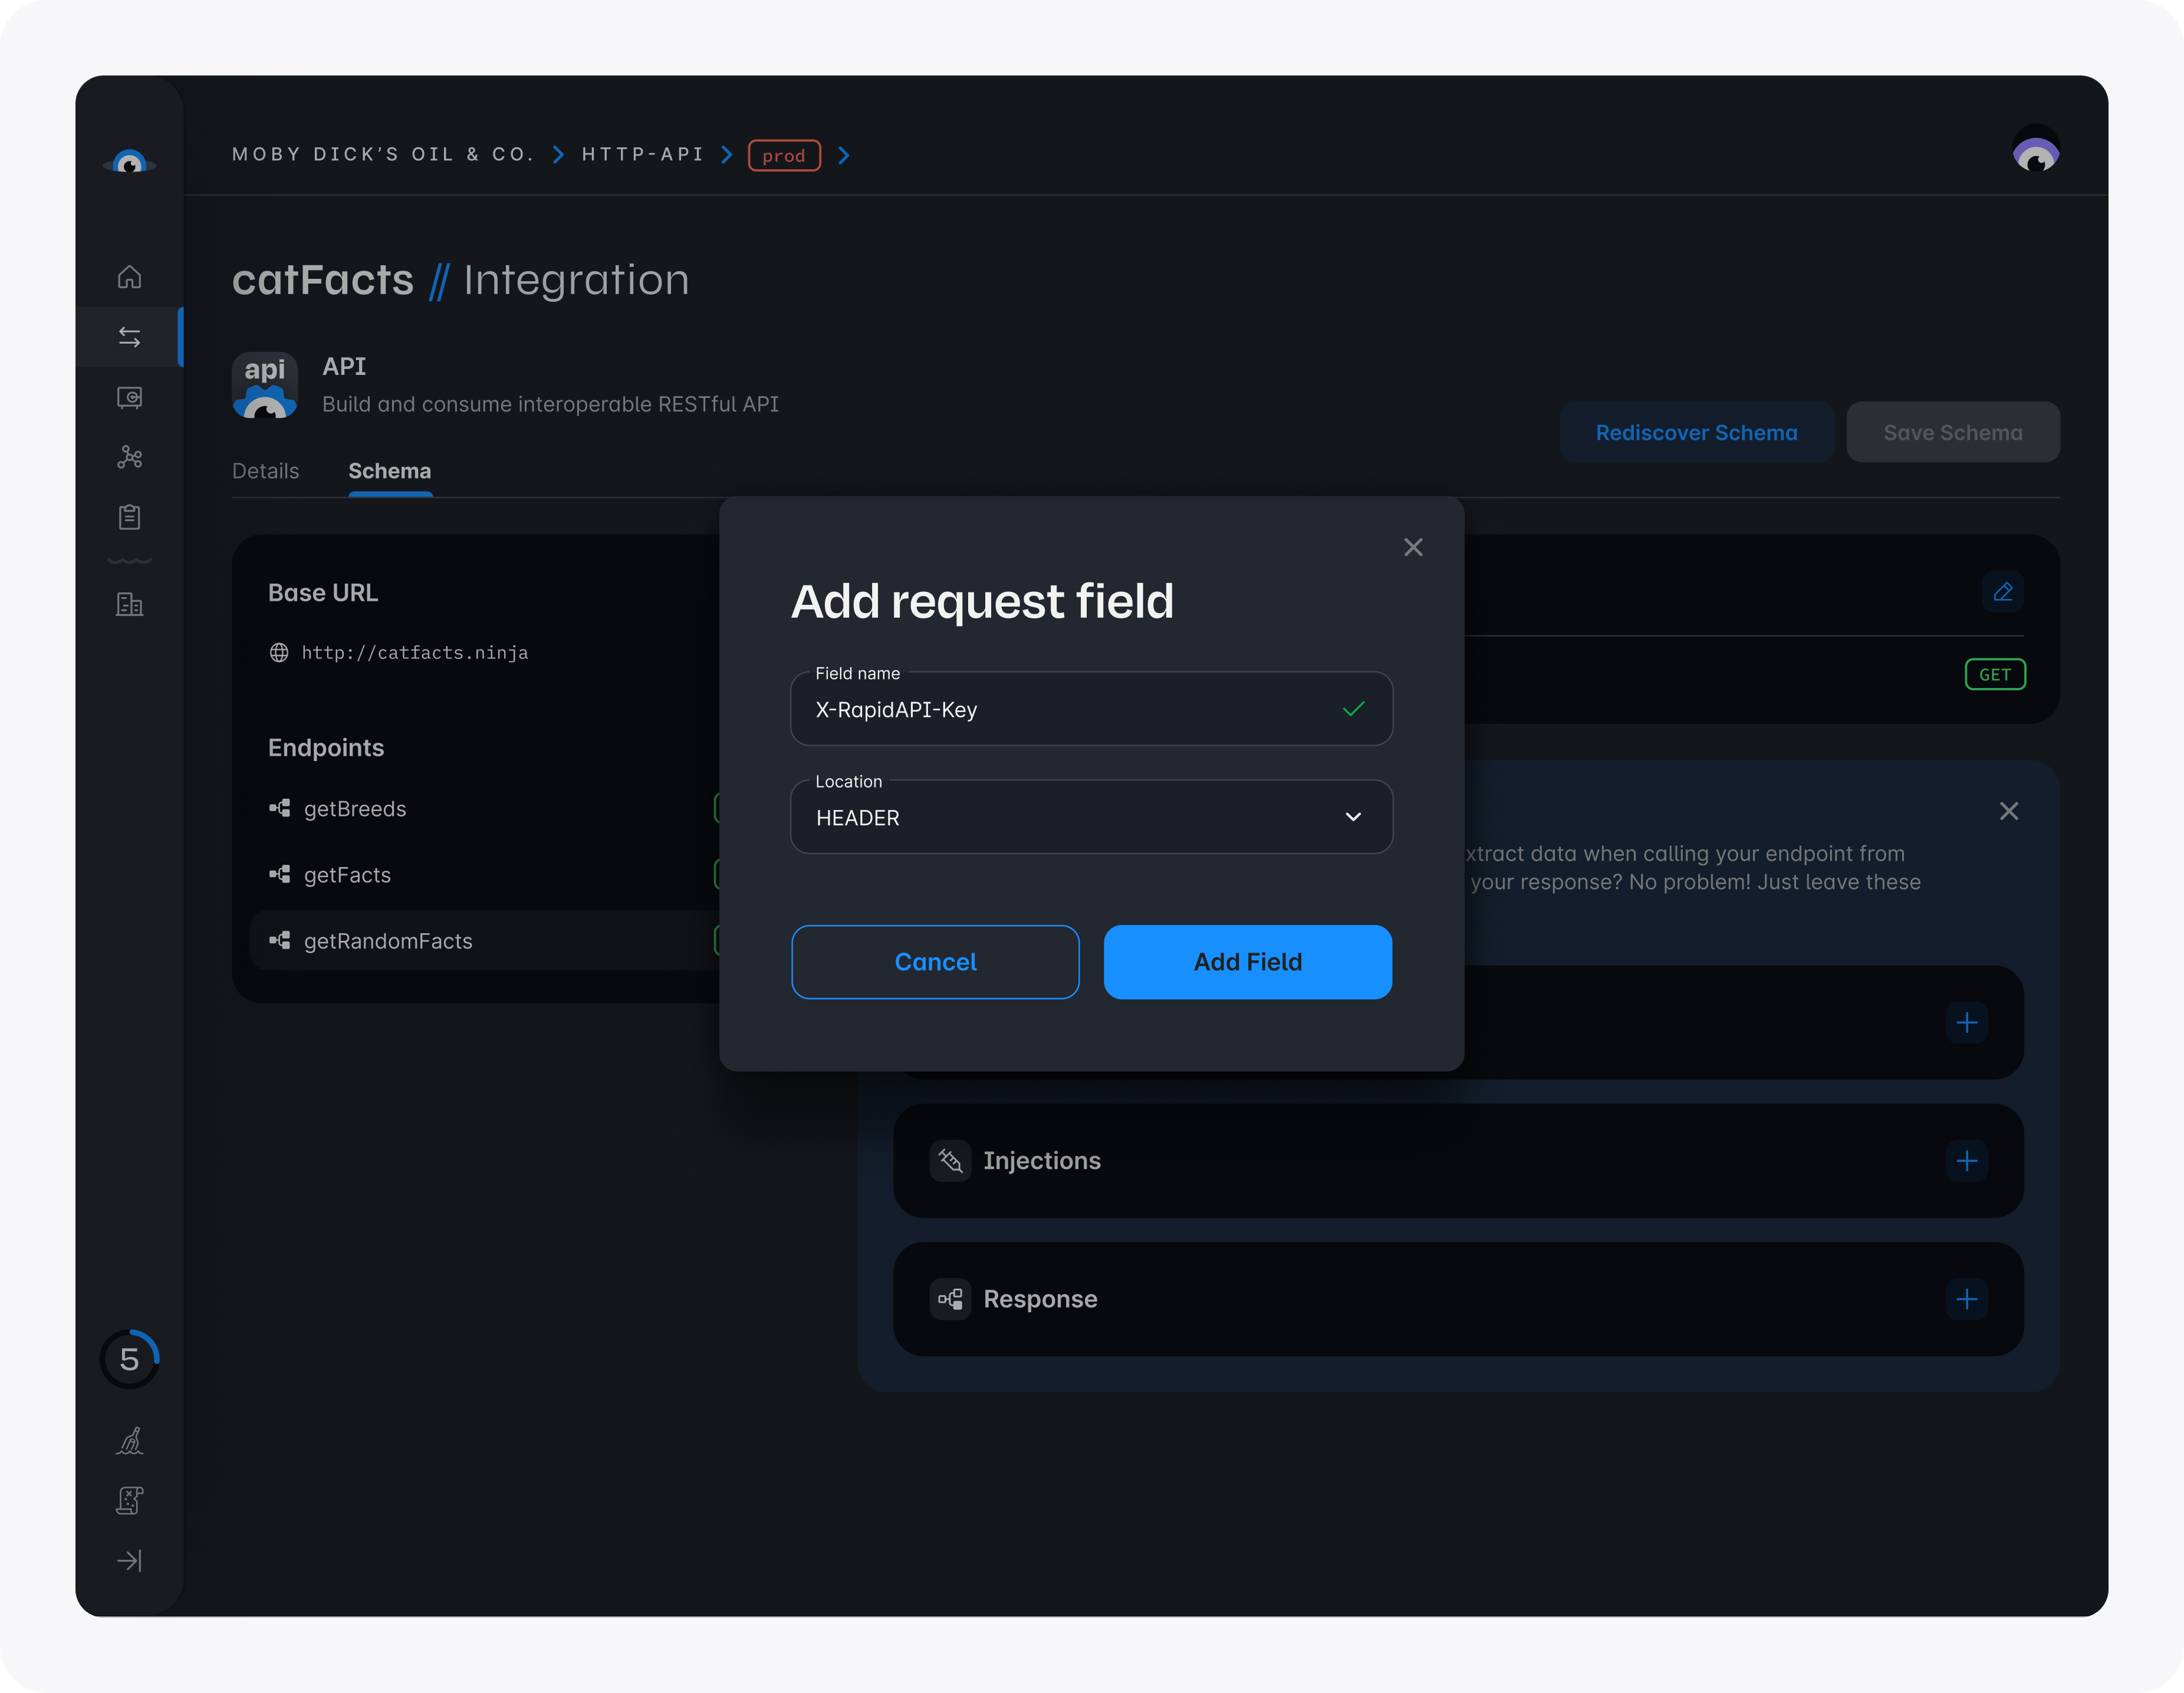
- Click the + within Request again and add a field named X-RapidAPI-Host. The location of the field is HEADER.
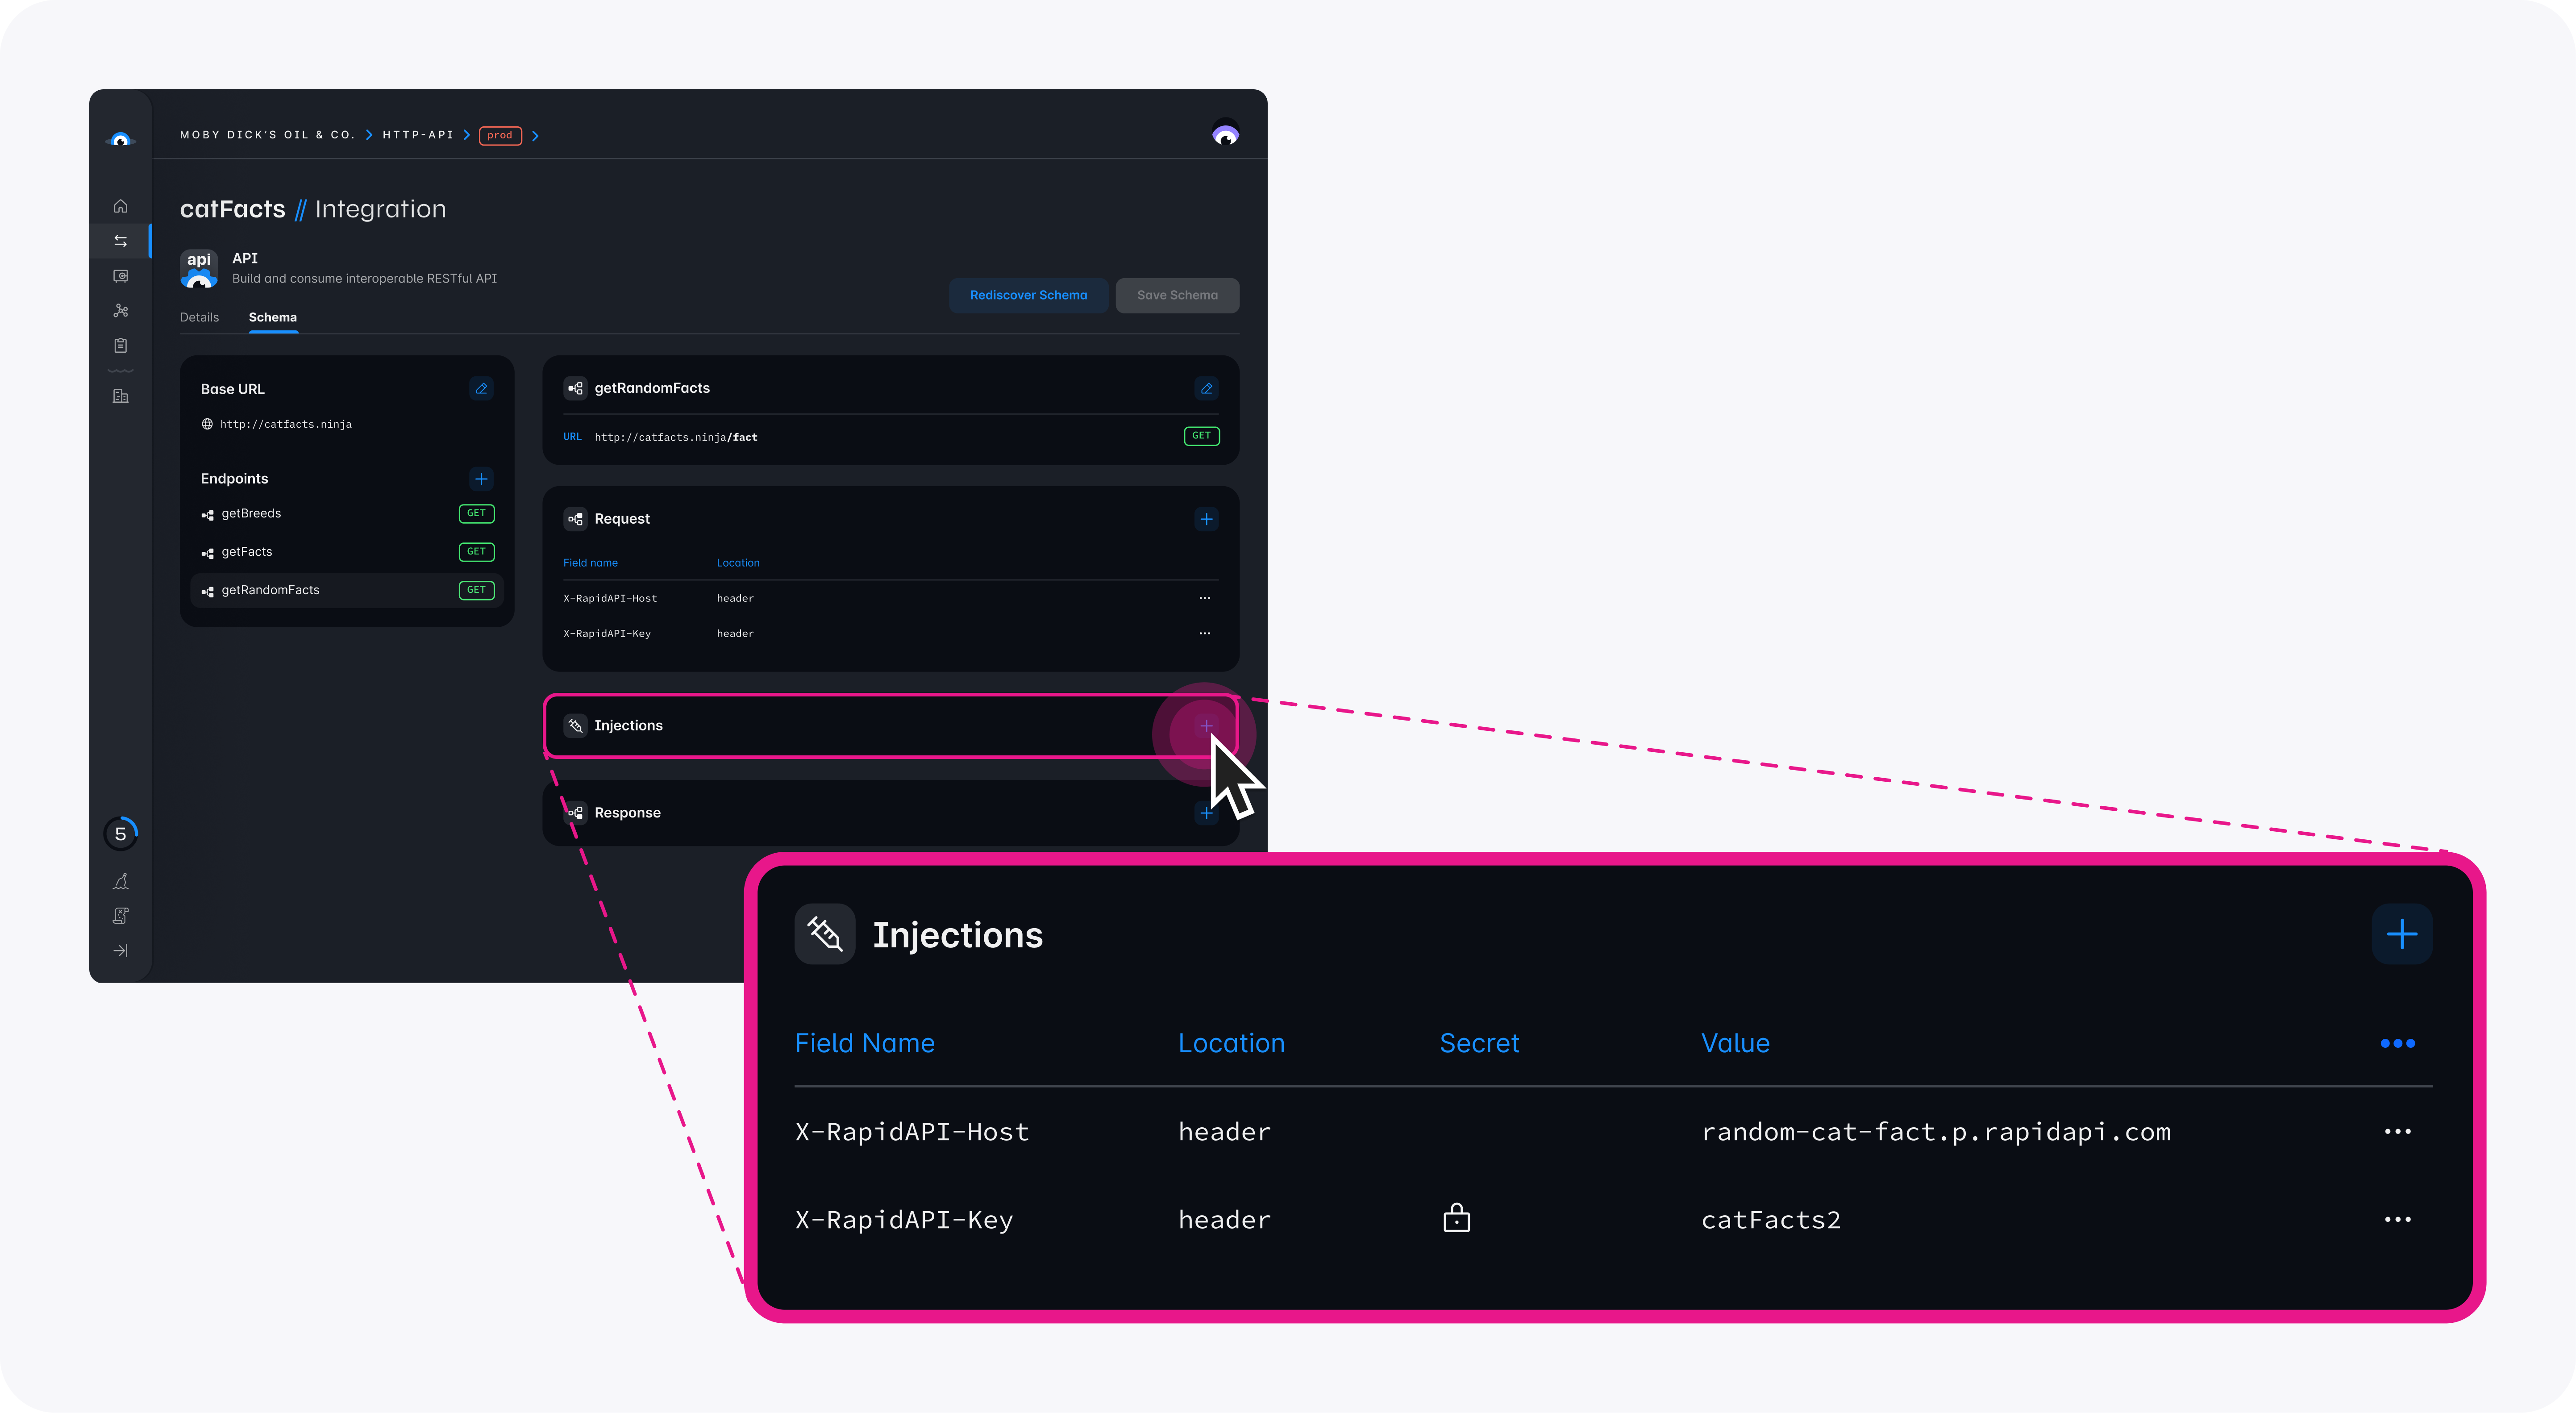
Rather than add these headers to the call from the client, we can use Squid's injections feature to allow specific fields to be added to all of the API calls from an endpoint. Since all of our calls require the X-RapidAPI-Key and X-RapidAPI-Host headers, we will add them to the Injections section of the schema. To keep our API key secure, we use Squid Secrets.
Click the + within Injections. Name the field X-RapidAPI-Key. Select HEADER as the location of the field.
Toggle Is this a secret value? to On. This brings up a dropdown in which to select a secret.
In the dropdown for Select secret, click Create secret.
Write catFacts2 as the Secret key.
For the secret value, copy your X-RapidAPI-Key value from the RapidAPI page for the Random Cat Fact API. Paste this as the value of the secret, and then click Save.
To save the field to inject, click Add field.
Click the + within Injections again. This time, name the field X-RapidAPI-Host. Select HEADER as the location of the field.
For the value of the field, write random-cat-fact.p.rapidapi.com, and then click Save.
To save all of the changes made to the schema, click Save schema.
In the frontend of your Cat Facts application, replace the current
useEffectinApp.tsxfunctionality with the following:
useEffect(() => {
  squid
    .api()
    .request('catFacts2', 'catFact')
    .then((data) => {
      console.log(data);
      setFact({
        fact: data.body['fact'],
        length: JSON.stringify(data.body['fact']).length,
      } as RandomFact);
    });
}, []);
- In the Squid backend, add functionality for authorizing access to the API by adding a second decorator:
  @secureApi('catFacts2')
  @secureApi('catFacts')
  secureCatFacts(context: ApiCallContext): boolean {
    return true;
  }
- Run the new version of your Cat Facts app by running
squid startin the backend andnpm run devfor the frontend. Your app is now accessing data from a secured API endpoint!
You now know how to access secured API endpoints using schema injections and Squid Secrets! To learn more about the available functionality for Squid HTTP API integrations, view the documentation on calling your API integration.