Add security to Squid AI
Secure a Squid AI chatbot using Auth0 authentication and backend authorization
With Squid AI, you can create rich chatbot experiences built on the context that you provide. You can also secure your chatbots in just a few lines of code using Squid's robust backend functionality. Rules can be as basic or as customized as you need to fit your unique use case. By using the @secureAiChatbot decorator, you can turn a TypeScript function into an endlessly customizable AI chatbot security solution. And since security functions are written in TypeScript, writing, interpreting, and updating security rules is as straightforward as updating any other function.
This tutorial goes thoroughly into the "what" and "why" of the steps to take to create and secure an AI chatbot so that by the end, you can feel confident in your understanding of Squid AI chatbots.
What you'll build
- A custom AI chatbot configured with authentication and authorization to limit chat access
- A React frontend application in which to run the Squid AI chatbot
What you'll learn
- How to create a Squid AI integration
- How to add a Profile and Context to your integration
- How to incorporate your Squid AI integration into a frontend
- How to create a Squid Service that adds security to your chatbot
What you'll need
- The Squid CLI
- A Squid account
- An Auth0 account with a single-page application configured to use React
Environment setup
- Install the Squid CLI using the following command:
npm install -g @squidcloud/cli
- Download the ai-tutorial-secure-chat code sample:
squid init-sample ai-tutorial-secure-chat --template ai-tutorial-secure-chat
Set up the Squid backend
There are two subfolders that make up the ai-tutorial-secure-chat project: frontend and backend. The backend folder contains the Squid backend for the app.
- Navigate to the Squid Cloud Console and create a new application named
ai-tutorial-secure-chat.
- In the Squid Cloud Console, navigate to the application overview page and scroll to the Backend project section. Click Create .env file and copy the command.
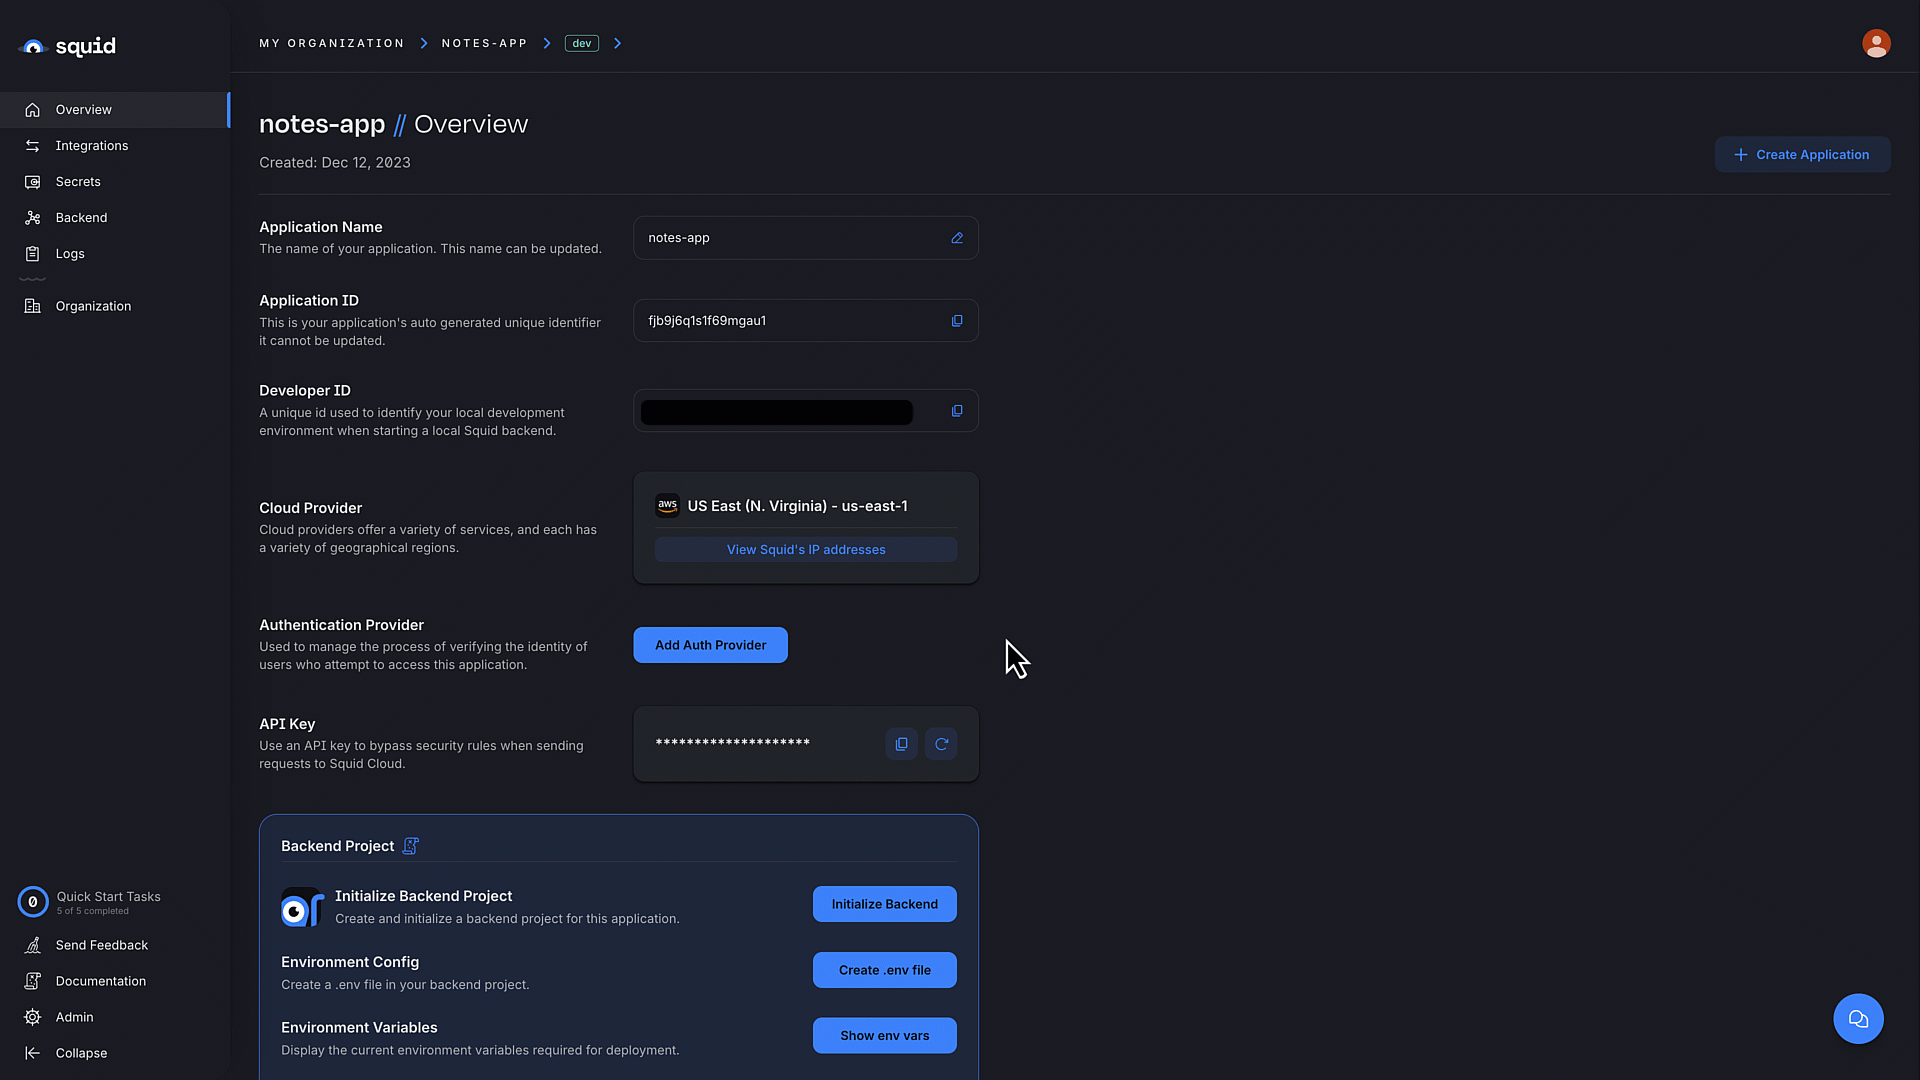
- In the terminal, change to the backend directory:
cd backend
- Create the
.envfile using the command you copied from the console. The command has the following format:
squid init-env \
--appId YOUR_APP_ID \
--apiKey YOUR_API_KEY \
--environmentId dev \
--squidDeveloperId YOUR_SQUID_DEVELOPER_KEY \
--region us-east-1.aws
- Install the required dependencies:
npm install
The backend is now set up and ready to use with a frontend!
Add the Squid AI integration
- In the Squid Console, ensure you are in the
devenvironment. If you are in theprodenvironment, click the prod button at the top of the window and select dev from the dropdown. - Select the Integrations tab.
- Click the Available integrations tab to view all integrations.
- Scroll to the AI Chatbot integration and click Add integration.
Enter
squid-facts-aias the Integration ID. - Click Add profile to add a profile to your chatbot. Name the profile squid-facts-chatbot. Toggle Set profile to public to off.
- Select GPT-4.0 from the Model name dropdown menu.
- Click Add. You have now added the Squid AI integration with a new profile!
A profile can be thought of as one distinct AI chatbot. You can have multiple profiles with different purposes. Notice profiles have two components: Instructions and Context.
- Instructions are the rule set for how the chatbot profile responds and answers questions. They can be about tone or purpose. For example, "You are a pirate. Only answer questions like a pirate would", or "You are a helpful customer support expert that understands camping products and can answer questions in detail”.
- Context is the body of knowledge the profile uses when responding to questions. Adding context allows the profile to provide relevant answers on specific topics that aren't part of the underlying AI model. Context can be text, URL, or file upload.
- Click the + next to Instructions to add a new instruction. Enter the following text as the instruction, and then press Add instruction:
You're a friendly AI who shares random facts about squids and answers user questions about squids.

Use only language that is appropriate for children.

Important: Only answer based on the provided context.
- Click the + next to Context to add context. Name the context Squid Wikipedia. Change the Context type to URL, and then enter the following URL:
https://en.wikipedia.org/wiki/Squid
Yes, this is just a link to the Wikipedia page on squids, but it's for demonstration purposes. ChatGPT likely already knows this information. In your own applications, you will provide context that is relevant to your use case. The URLs or text you provide most often come from your own sources on which ChatGPT was not trained.
Add the Auth0 integration
- If you haven't yet made an Auth0 API, set up an Auth0 account and create a single-page application configured to use React and an audience using an Auth0 API. Use
'squid-ai'as the API audience. When adding the callback and logout URLs, usehttp://localhost:5173. - In the Squid Cloud Console in the
devenvironment, select the Integrations tab. - Click the Available integrations tab to view all integrations.
- Scroll to the Auth0 integration and click Add integration.
- Enter auth0 for the Integration ID.
- Enter the client ID and audience for your Auth0 app. These can be found in the Auth0 console.
- Click Add integration.
Add Squid Cloud to the frontend
The following steps add configuration parameters to connect the application to Squid.
- Open a new terminal window and navigate to the project's frontend. You should now have two open terminal windows: one for the app's backend and one for the frontend.
cd frontend
- Install the required dependencies:
npm install
- Run the following command to create a
.env.localfile with the Squid environment configuration needed to initialize Squid:
npm run setup-env
- Navigate to
squid-facts/src/main.tsx. Notice there is anAuth0Providercomponent, that requires configuration:
ReactDOM.createRoot(document.getElementById('root') as HTMLElement).render(
  <Auth0Provider
    domain="AUTH0_DOMAIN"
    clientId="AUTH0_CLIENT_ID"
    authorizationParams={{
      redirect_uri: window.location.origin,
      audience: 'squid-ai',
    }}
  >
  <SquidContextProvider
    options={{
      appId: import.meta.env.VITE_SQUID_APP_ID,
      region: import.meta.env.VITE_SQUID_REGION,
      environmentId: import.meta.env.VITE_SQUID_ENVIRONMENT_ID,
      squidDeveloperId: import.meta.env.VITE_SQUID_DEVELOPER_ID,
    }}
  >
      <App />
    </SquidContextProvider>
  </Auth0Provider>
);
Replace the placeholders in the
Auth0Providercomponent with the domain and client ID from your Auth0 application.Open the
App.tsxfile and add the following imports:
import { useAuth0 } from '@auth0/auth0-react';
import { useSquid } from '@squidcloud/react';
This imports the Auth0 and Squid React libraries.
- Add the following code to the
Appfunction:
// Get Auth0 authentication state.
const { user, isLoading, getAccessTokenSilently } = useAuth0();
const { setAuthProvider } = useSquid();

useEffect(() => {
  setAuthProvider({
    integrationId: 'auth0_integration_id',
    getToken: () => user && getAccessTokenSilently(),
  });
  if (isLoading) return;
  if (!user) {
    setLoginMessage('You are logged out!');
    setToastOpen(true);
  } else {
    setLoginMessage('You are logged in!');
    setToastOpen(true);
  }
}, [user, isLoading, getAccessTokenSilently, setAuthProvider]);

if (isLoading) {
  return <span>Loading...</span>;
}
This code sets the auth provider to Squid, passing the Access token from Auth0. This sends the token to the Squid backend for configuring authorization.
- In the return statement, change the value of the
isAuthenticatedprop fromfalseto!!user:
<NavBar isAuthenticated={!!user} />
This informs the NavBar of which button to display: a login button or a logout button.
Checkpoint
At this point, you have added all the code that will be in App.tsx. Here's a look at the final file:
import SquidFactsAI from './components/squid-facts-ai';
import './App.css';
import NavBar from './components/nav-bar';
import { useEffect, useState } from 'react';
import { useAuth0 } from '@auth0/auth0-react';
import { useSquid } from '@squidcloud/react';
import { Snackbar, Alert } from '@mui/material';

function App() {
  // Set state of toast message
  const [toastOpen, setToastOpen] = useState(false);
  const [loginMessage, setLoginMessage] = useState('');

  // Get Auth0 authentication state
  const { user, isLoading, getAccessTokenSilently } = useAuth0();
  const { setAuthProvider } = useSquid();

  useEffect(() => {
    setAuthProvider({
      integrationId: 'auth0_integration_id',
      getToken: () => user && getAccessTokenSilently();
    });
    if (isLoading) return;
    if (!user) {
      setLoginMessage('You are logged out!');
      setToastOpen(true);
    } else {
      setLoginMessage('You are logged in!');
      setToastOpen(true);
    }
  }, [user, isLoading, getAccessTokenSilently, setAuthProvider]);


  if (isLoading) {
    return <span>Loading...</span>;
  }

  const handleToClose = () => {
    setToastOpen(false);
  };

  return (
    <>
      <NavBar isAuthenticated={!!user} />
      <img src="https://upload.wikimedia.org/wikipedia/commons/e/e1/Sepioteuthis_sepioidea_%28Caribbean_Reef_Squid%29.jpg" />
      <SquidFactsAI />
      <Snackbar
        open={toastOpen}
        onClose={handleToClose}
        autoHideDuration={6000}
      >
        <Alert severity="success">{loginMessage}</Alert>
      </Snackbar>
    </>
  );
}

export default App;
Add Squid AI Chatbot functionality
- In the
src/componentsfolder, open thesquid-facts-ai.tsxfile. Scroll down to the return statement and notice that there is aTextFieldcomponent and aButtoncomponent. This is where the user asks questions to the chatbot. There is also an emptydivcomponent where the chat history will be displayed. Add the following imports:
import Messages from './messages';
import { useAiChatbot } from '@squidcloud/react';
The useAiChatbot function lets the client use Squid AI to chat.
- Add the following to the
SquidFactsAIfunction:
const { history, chat, complete, error } = useAiChatbot(
  'squid-facts-ai',
  'squid-facts-chatbot'
);
squid-facts-ai is the integration ID we chose in the console, and squid-facts-chatbot is the profile ID.
- Right now the
askQuestionfunction just sets the value ofquestionto an empty string, but it doesn't actually ask the question. Add thechatfunction toaskQuestionto ask questions to the chatbot:
function askQuestion() {
  chat(question);
  setQuestion('');
}
- Add the
Messagescomponent to the emptydiv:
<div className="scrolling">
  <Messages messages={history} />
</div>
This passes the conversation history to a prop in the Messages component, which then displays it.
- Update the
Buttonso that it is disabled until a chat response is complete, and then add adivthat displays the error message if an error occurs when using the chatbot:
...
return (
...

<Button variant="contained" disabled={!complete} onClick={askQuestion}>
  Ask question
</Button>
{ error && <div>{error.toString()}</div>}

...
)
Checkpoint
You have now completed the code for this component. Here is all the code for the squid-facts-ai.tsx file:
import { ChangeEvent, useState } from 'react';
import { TextField, Button } from '@mui/material';
import Messages from './messages';
import { useAiChatbot } from '@squidcloud/react';

const SquidFactsAI = () => {
  const [question, setQuestion] = useState('');
  const { history, chat, complete, error } = useAiChatbot(
    'squid-facts-ai',
    'squid-facts-chatbot'
  );

  function askQuestion() {
    chat(question);
    setQuestion('');
  }

  function questionChanged(e: ChangeEvent) {
    setQuestion((e.target as HTMLInputElement).value);
  }

  function checkKey(ele: React.KeyboardEvent<HTMLDivElement>) {
    if (ele.key === 'Enter') {
      askQuestion();
    }
  }

  return (
    <>
      <div className="scrolling">
        <Messages messages={history} />
      </div>
      <div className="question">
        <TextField
          fullWidth
          id="outlined-basic"
          label="Enter your question"
          variant="outlined"
          onChange={questionChanged}
          onKeyDown={(event) => checkKey(event)}
          value={question}
        />
        <Button variant="contained" disabled={!complete} onClick={askQuestion}>
          Ask question
        </Button>
        {error && <div>{error.toString()}</div>}
      </div>
    </>
  );
};

export default SquidFactsAI;
Set up the Messages component
Open the messages.tsx file and replace the contents of the file with the following code:
import { useEffect, useRef } from 'react';
import { ChatMessage } from '@squidcloud/react';

interface ChatHistoryProps {
  messages: ChatMessage[];
}

const Messages: React.FC<ChatHistoryProps> = ({ messages }) => {
  const messagesEndRef = useRef<HTMLDivElement>(null);

  const scrollToBottom = () => {
    messagesEndRef.current?.scrollIntoView({ behavior: 'smooth' });
  };

  useEffect(() => {
    scrollToBottom();
  }, [messages]);

  return (
    <div className="messages">
      {messages.map(({ id, message, type }) => (
        <div key={id}>
          <span key={id}>
            <b>{type}:</b> {message}
          </span>
        </div>
      ))}
      <div ref={messagesEndRef} />
    </div>
  );
};

export default Messages;
This code displays the chat messages. The type of a ChatMessage is the author of the message. It is either the user or AI.
Secure the AI on the Squid backend
Navigate to the backend folder. This contains any Squid backend logic. Open the src/service/ai-security-service.ts file. Add the following code to the file:
import { secureAiChatbot, SquidService } from '@squidcloud/backend';

export class AiSecurityService extends SquidService {
  @secureAiChatbot('squid-facts-ai', 'chat', 'squid-facts-chatbot')
  allowChat(): boolean {
    // or add custom authorization here
    return this.isAuthenticated();
  }
}
This creates a Squid Service that allows the client to chat with the chatbot if they are authenticated. The setAuthProvider function we called on the frontend informed the backend of the user's authentication status. The @secureAiChatbot decorator is used to set security rules. While this example only verifies that the user is authenticated, you can add customized authorization rules. For example, you could query a database to check if the user is part of a permitted list of users.
Check out the documentation to learn more about security and authentication.
Try out the app
- To run the backend locally, run the following command in the
backenddirectory:
squid start
- In a separate terminal window, run the following command from the
frontenddirectory:
npm run dev
You now have two terminal windows: one running the backend and the other running the frontend.
To view the app, navigate to localhost:PORT where PORT is logged in the terminal. The address will likely be
http://localhost:5173.Ask a question about squids to the chatbot. Notice you do not get a response. Instead, an unauthorized message appears.
Log into the app and ask a question again. Now the AI chatbot will chat with you!
Feel free to keep asking questions and to see what happens when you log out and in. With the Squid Service on the backend handling authorization, you can rest easy knowing only authenticated users will have access to the service.
Here are some questions to try:
- Do squids have arms or tentacles?
- What should I do if I encounter a squid?
- What's your favorite fact about squids?
- Tell me about the Onykia ingens.
Share your favorite squid questions and answers with the Squid Squad on Discord or X.
Conclusion
Congratulations! You just added a chatbot to an app, and then secured it using the Squid Backend SDK. Feel free to keep asking questions to see just how much this AI chatbot knows about squids!
Next steps
Now that you know how to limit chatbot access to authenticated users, here are some other things to try:
- Add a new profile to your Squid AI based on your use case. For example, SquidAI can support a different persona for each part of your user engagement: sales, support, product experts and more.
- Connect your database to your frontend using Squid middle tier to enable data access capabilities through the Squid Client SDK.
- Think of other properties on which you might secure your Squid AI. For example, you might want users to sign a consent form first. You can log consent status in your database, and then verify on the backend that the user is logged in and has signed the consent form.
Clean up
To prevent further billing, delete the Squid app in the Squid Console by selecting the Overview tab for the app and scrolling down to Delete Application.